Most ecommerce businesses are issuing purchase orders (POs) formally or informally. Most of the time, these get buried in long email chains and WhatsApp messages.
Most companies could provide their purchase orders in Google Drive or software like a Shopify app if pressed.
However, only some are integrating and streamlining the use of POs across their accounting and finance functions to make better decisions for the business.
POs ensure that inventory and COGS are accurate and traceable and support cash flow forecasting significantly. But most DTC brands need to utilize POs more effectively.
The kicker is that this data is hiding in plain sight. It doesn’t live in a vault that a third party must unlock. Your business generates it.
In reading this article, you’ll learn how to set up your tech stack so that purchase order data can fuel your business’s financial decisions without tedious effort.
In this article:
- What are Purchase Orders?
- The Value of Purchase Orders in Your Business
- Understanding the Flow from Data to Decision
- How to Operationalize Purchase Orders
- How to Manage Purchase Orders in Quickbooks
- Get Started with Purchase Orders
What are Purchase Orders?
First, a quick refresher on purchase orders (POs).
POs are (usually) legally binding agreements that detail a buyer’s request for products or services from a supplier. When a buyer issues a PO to a supplier, they ask for a specific product or service, including the quantity and agreed-upon price, without paying for the item in question at the time of issue.
Usually, the supplier accepts the PO and agrees to the terms to prepare the commercial invoice.
The Value of Purchase Orders in Your Business
DTC founders sometimes think POs are cumbersome and unnecessary, especially for new or smaller-sized businesses. But they become essential as your business becomes increasingly complex.
Technically speaking, lacking this core piece of the puzzle results in inaccurate cash flow forecasts and balance sheets, inefficient inventory management, and unnecessary costs.
When you start utilizing POs to their full potential, you’ll find better cash flow forecasting, happier suppliers, more accurate COGS, and less time spent on accounting tasks.
Better Cash Flow Forecasting & More Accurate COGS
Most businesses aren’t integrating open POs into cash flow forecasting.
If the data is entered into the accounting system – or any system – you can easily download an open purchase order report and understand how much cash is owed over the next 30/60/90 days. Furthermore, inputting POs into a single system allows for prepayment tracking made to vendors for goods or services they have yet to deliver.
POs are also crucial in controlling and managing budget spending by offering clear visibility into expenses. This transparency allows companies to assess their spending patterns, adjust budgets accordingly, and prevent overspending.
Improved Supplier Relationships (aka Happier Suppliers)
POs aid a happier relationship between ecommerce owners and suppliers.
By ensuring clear communication, these highly detailed documents help both parties agree on the expectations for each transaction. You should record every inventory purchase using a formal PO – which can include packaging materials – which can help in two ways.
Firstly, they act as legally binding documents that hold suppliers accountable in case of any disputes over the sale terms.
For example, if you ordered three dozen widgets but only received two dozen, the PO can help resolve the disagreement. Secondly, a PO can help during a financial audit by providing a record of purchases and clarifying business expenses instead of relying on separate receipts and invoices.
Less Time Spent on Accounting Tasks
POs help manage shipments and streamline the purchasing process.
With a unique PO number assigned to each order, you can easily track shipments, stay informed when the product is received, and eventually match it to an invoice.
Suppliers don’t consistently deliver products on time. But tracking POs in a system allows updating the “expected delivery date” to keep everyone on the team informed. The shipment may not arrive on time, but at least the team is on the same page about the latest estimate.
Lastly, utilizing standardized POs saves time for you and your suppliers, as it establishes a straightforward and efficient communication process, leading to a smoother purchasing experience for all parties involved.
Understanding the Flow from Data to Decision
It helps to think about POs as a data source and how it funnels into your other financial sources.
We can think about your financial structure in three levels. The three levels are the…
- Data level (PO)
- Accounting level (Quickbooks)
- Finance Planning & Analysis (FP&A) level (budget, projections, and cash flow)

The PO data flows into QuickBooks.
From Quickbooks, POs serve two primary functions to help you make better decisions
- Understanding Historical or “What Happened”
- Understanding the Future or “What’s Going to Happen”
What do we mean by this?
As the POs are fed into the budget/projections and cash flow forecast, you can clearly understand things like…
- Average inventory purchasing (Historical)
- Cash owed in the next 30/60/90 days (Future)
- Any changes/negotiations needed with key suppliers (Future)
- Potential cash deficits (Future)
Without this critical step, understanding your budget/projections and cash flow forecast is impossible.
How to Operationalize Purchase Orders
We’ve done our best to convince you that POs are an essential part of your business’s success in that it unlocks your decision-making speed and certainty.
Now you’re wondering how to make this happen and who’s in charge of getting it done.
This is not just a finance and accounting activity!
We’ve outlined all tasks associated with purchase orders, whose responsibility it should be, and how often it needs to get done based on our experience working with 8 and 9-figure brands.
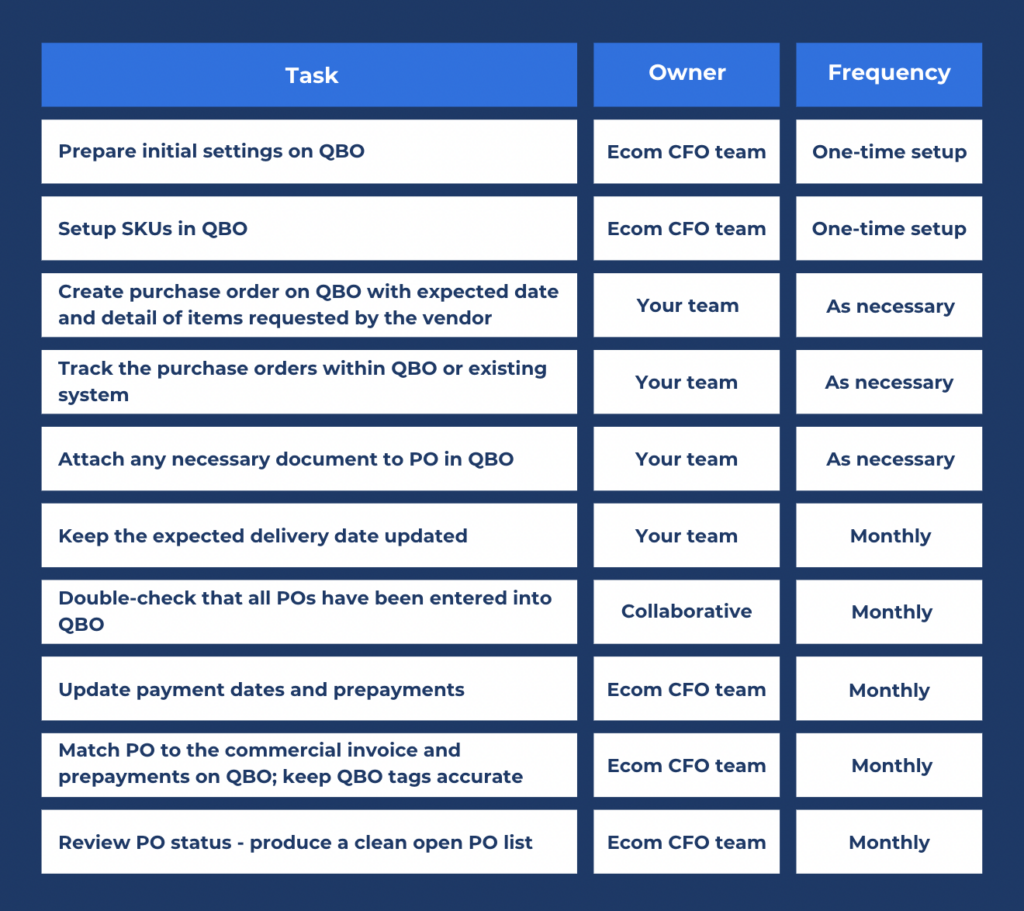
A big step is entering the purchase order into your accounting system, but the process doesn’t stop there.
The best thing to do is create a formalized purchase order SOP for your team. You might have an in-house finance team or individual who can own this process. If not, ECOM CFO can help you set up your PO system and manage your financial operations.
Our Process
We’ve formalized a simple, unique purchase orders SOP so that your team can:
- Keep consistency across all of your sales, budgets, and projections
- Define responsibilities between the tasks of your team and ours
- Deliver Investor Grade Financials on time every month
- Help track inventory in quantities to improve our inventory review process
Whether you manage this process in-house or with our team, we’ll equip you with a detailed step-by-step process for entering and managing POs effectively.
How to Manage Purchase Orders in Quickbooks
Many accounting and inventory management solutions are in the market today, but Quickbooks is still the most common. Often founders get sold on new systems and feel like they’re “upgrading” from Quickbooks without understanding QBO’s complete feature set.
In QuickBooks, you have the tools to run every aspect of the sales cycle, including purchasing.
- Set Up Purchase Orders in Quickbooks
- Record, Track, and Process Purchase Orders
- Manage Vendor Prepayments
Set up Purchase Orders in Quickbooks
As you saw in the table above, this is a step that ECOM CFO can do for you, but your team can also do it.
👉🏻 Turn on the Purchase Order Feature
If you haven’t already, turn on the purchase order feature:
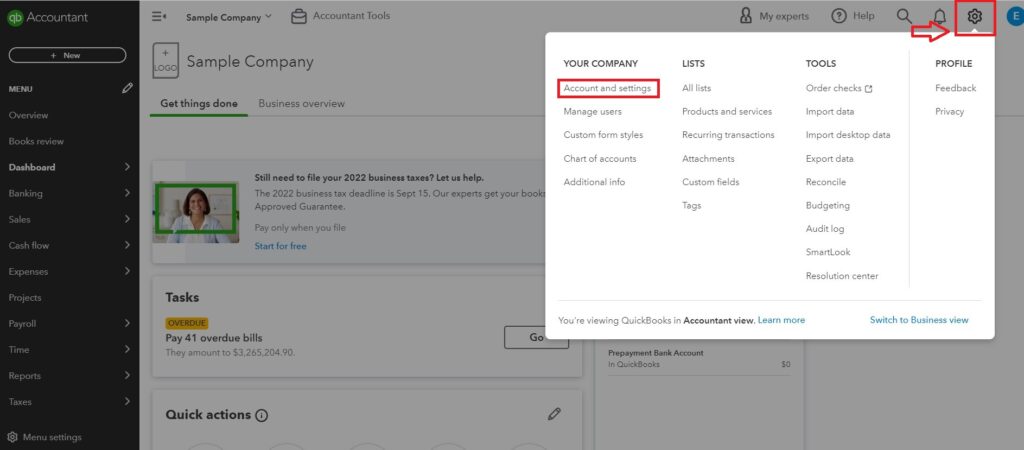
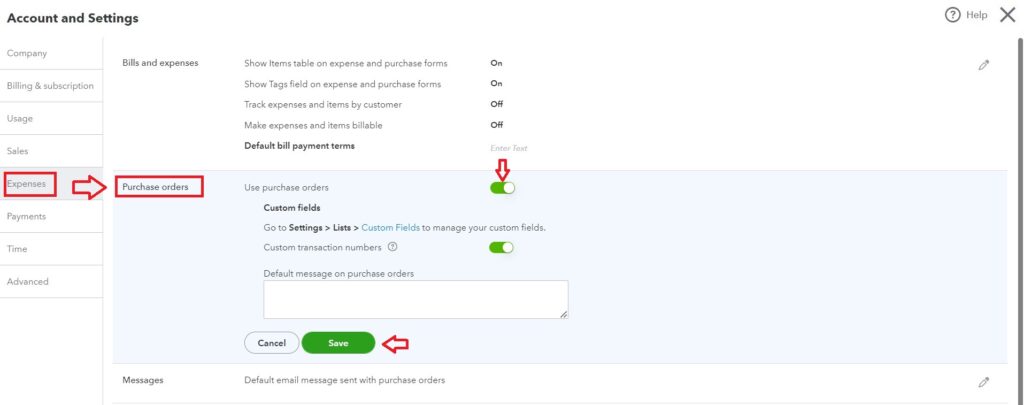
- Go to Settings and select Account and Settings.

- Select Expenses.

- Go to Purchase Orders, and select Edit.
- Switch on the Use Purchase Orders options.
- Enter up to three custom fields and a vendor default message. These are optional.
- Select Save and then Done.
👉🏻 Turn on Itemization on Bills
Make sure your bills are set up to display the items table so you can itemize your products and services.
- Go to Settings, then Account and Settings.

- Select Expenses.
- In Bills and Expenses, select edit.
- Switch on Show Items table on expense and purchase forms.
- Select Save, then Done.
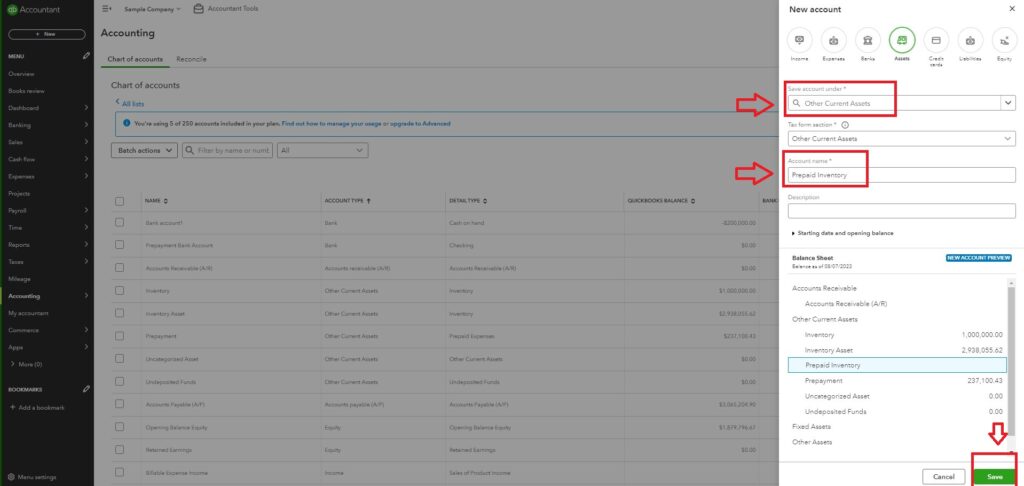
👉🏻 Create an “Other Current Asset” Account to Track Prepayments
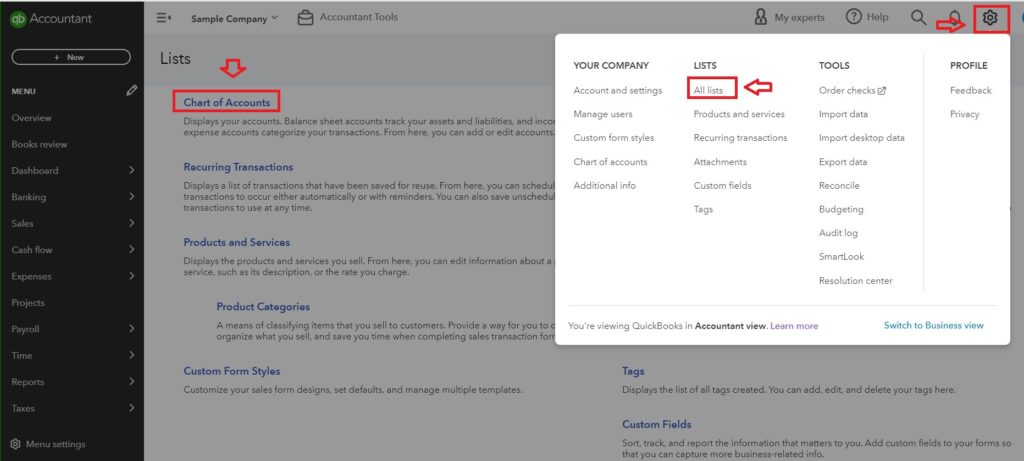
- Go to the Lists menu, then select Chart of Accounts.

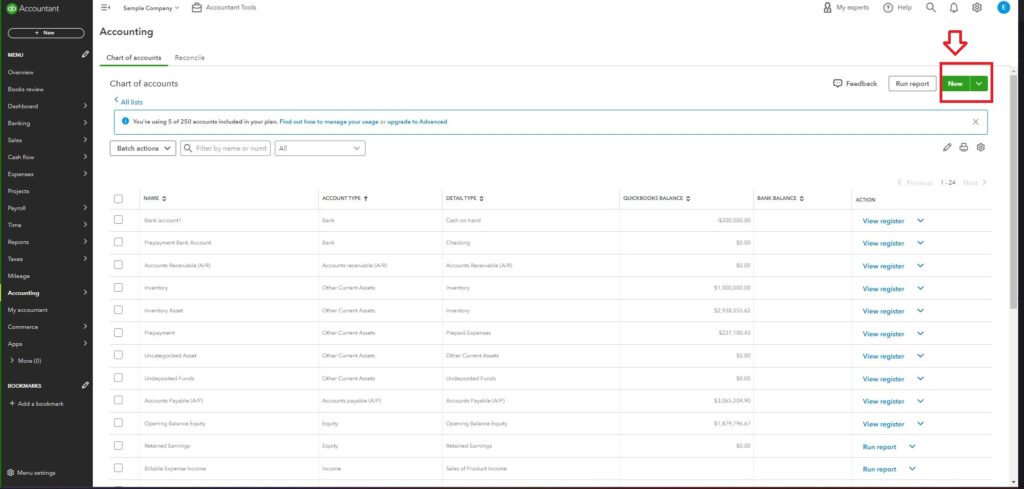
- In Chart of Accounts, select New.

- From the Other Account Types drop-down, select Other Current Asset. Select Continue.

- Enter “Prepaid Inventory” as the Account Name.
- Select Save & Close.
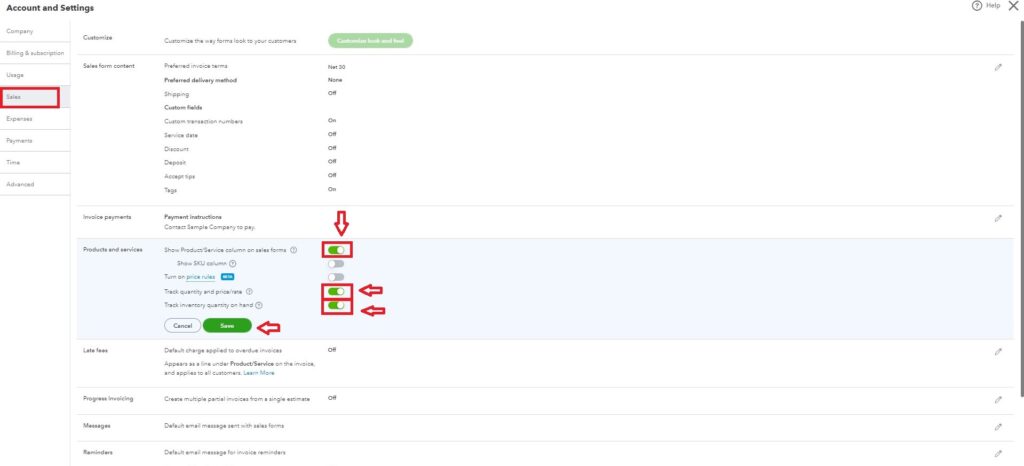
👉🏻 Turn on Inventory Tracking
- Go to Settings and select Account and Settings.

- Click on the Sales tab.

- Select Edit in the Products and Services section.
- Turn on Show Product/Service column on sales forms.
- Turn on Track Quantity and Price/Rate and Track Inventory Quantity on Hand.
- Select Save and then Done.
💡Tip
You must set up your first inventory item before you can begin managing POs in Quickbooks. Here’s how.
Record, Track, and Process Purchase Orders
You’re ready to record, track, and process POs in Quickbooks. This video walks you through how to enter a purchase order and how to order and account for new inventory using a purchase order.

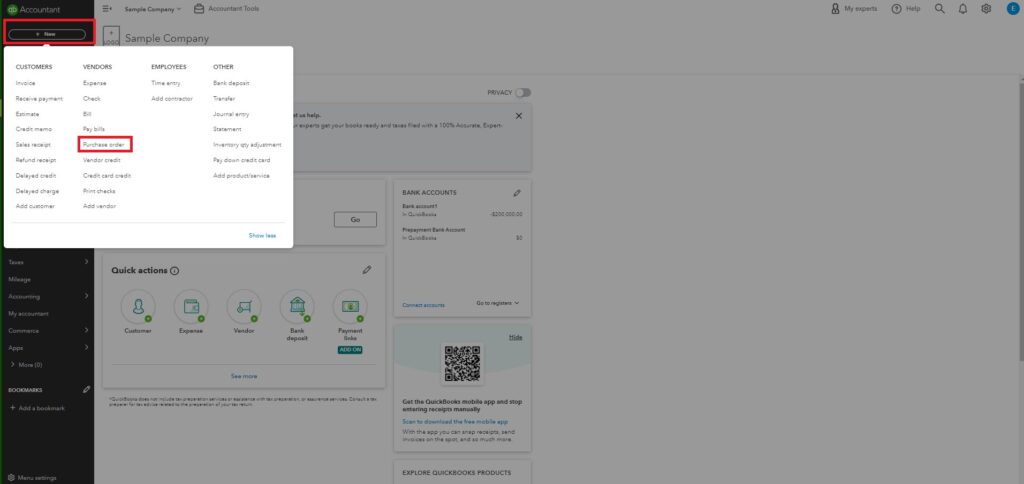
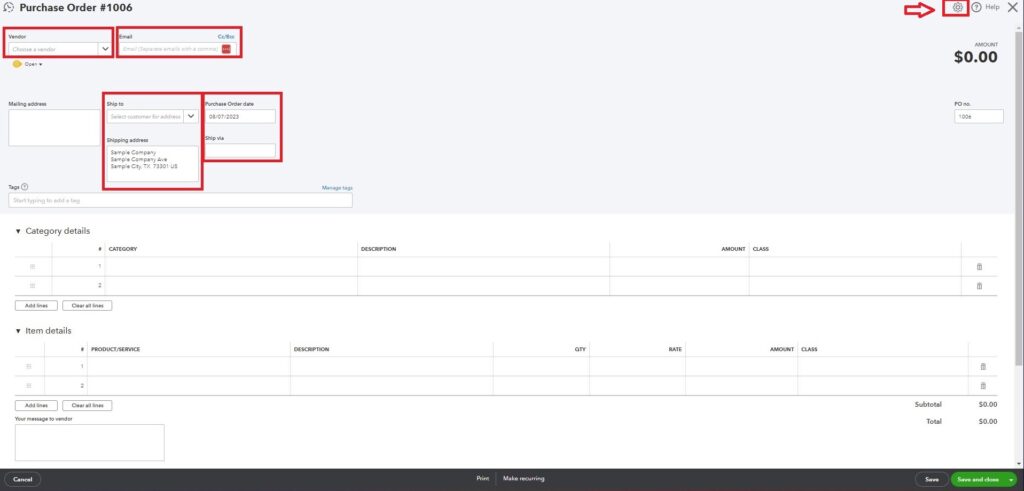
👉🏻 Create and Send a Purchase Order
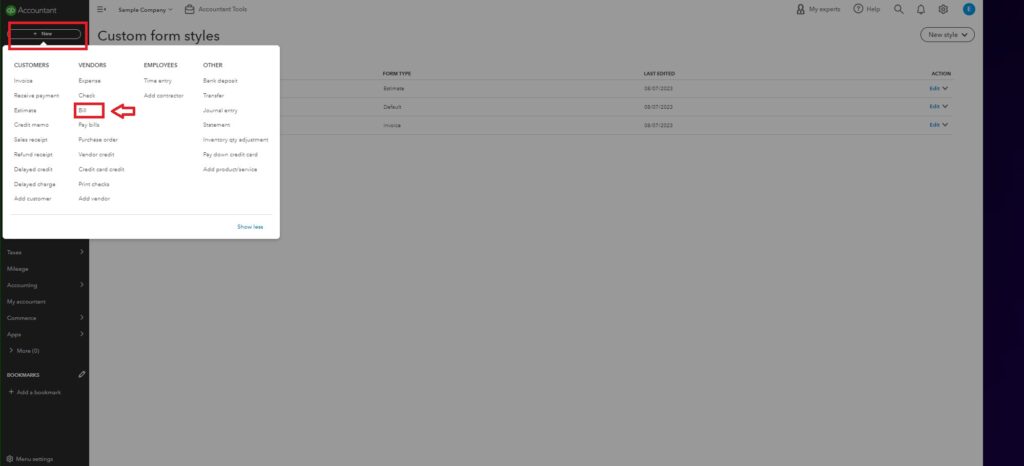
- Select + New.
- Select Purchase Order.

- From the Vendor ▼ dropdown, select the vendor.

- Review the Mailing address.
- If you’re shipping the products directly to a customer, select the Ship to ▼ drop down and then Ship via. Check the Shipping address to make sure it’s correct.
- Enter the Purchase Order date.
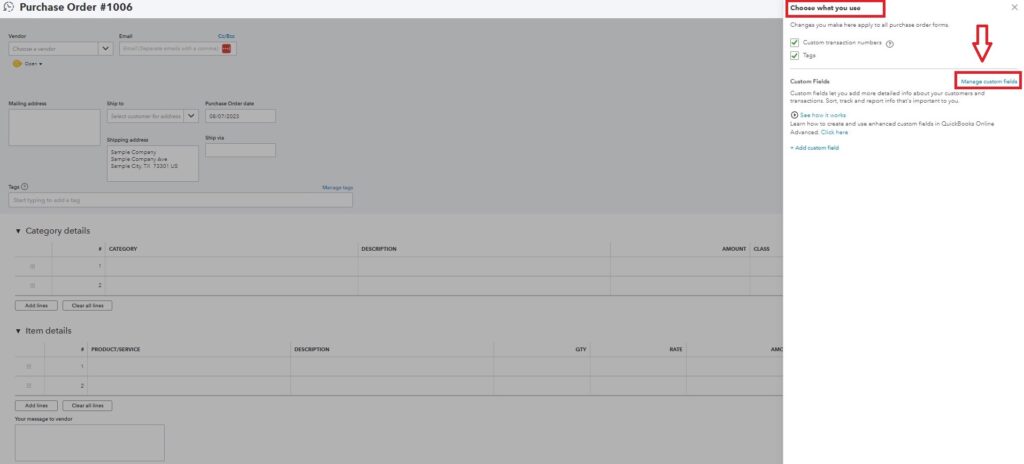
- Select Settings on the Purchase Order form, then on the Choose What You Use panel, select the link to add your custom fields.

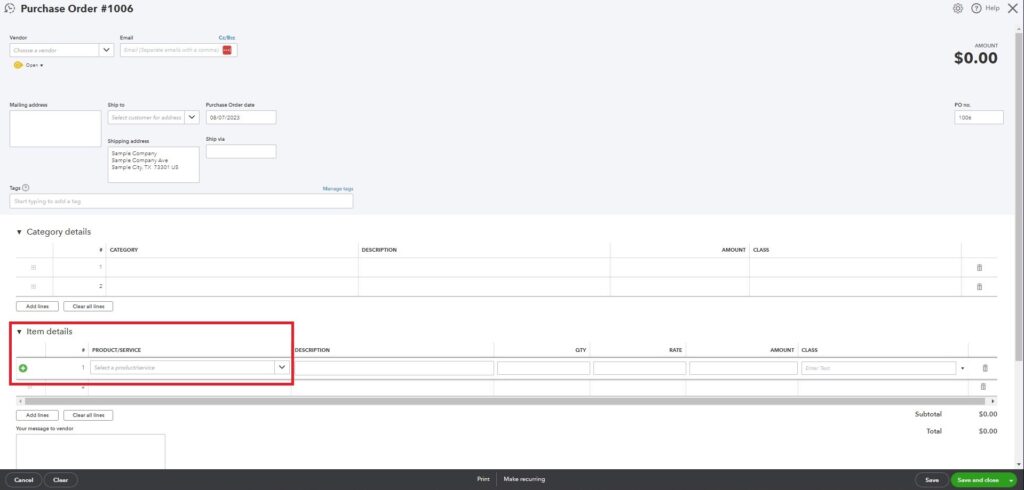
- In the Item Details section, enter the products you want to purchase. Note: You can only add products or services you marked as “I purchased this product/service from a vendor.” Learn more about editing products and services.

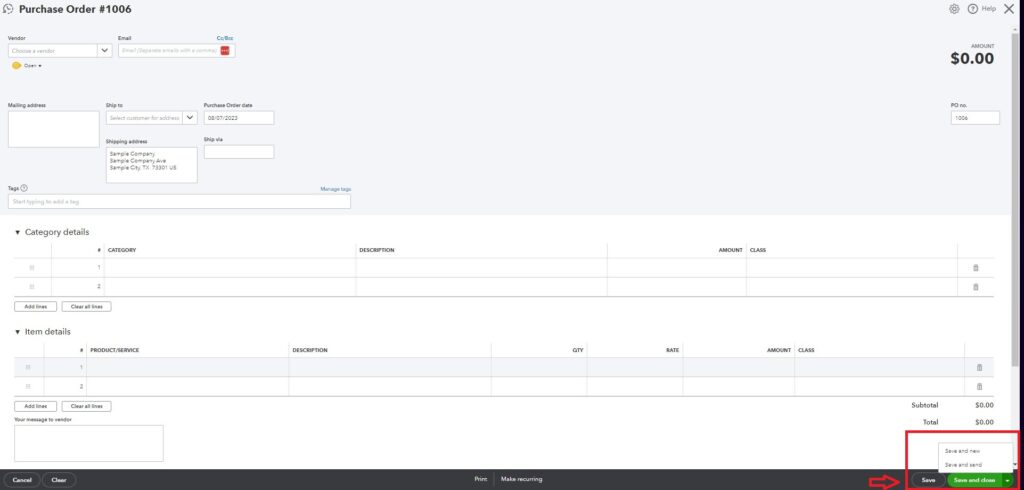
- When you’re done, select Save and Close. Or if you’re ready to send it, select Save and Send ▼dropdown.

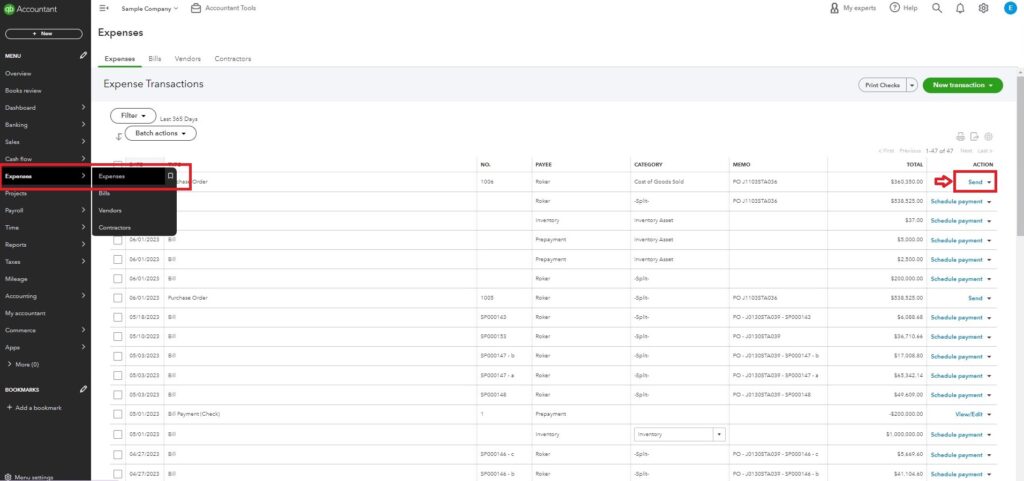
- If you decide to send the purchase order later, go to Expenses. Find your purchase order and select Send in the Action column.

👉🏻Update the Status of a Purchase Order and Add it to a Bill
When you create a purchase order, the status is Open. Once your vendor accepts the purchase order, you can add it to an expense or bill to make the transaction official.
Follow the steps below to add purchase orders to expenses or bills. QuickBooks will automatically change the status to Closed.
👉🏻Add a Purchase Order to an Expense, Bill, or Check
Follow these steps after your vendor accepts the purchase order:
- Select + New.
- Select Expense, Check, or Bill. Learn when to use expenses or bills.

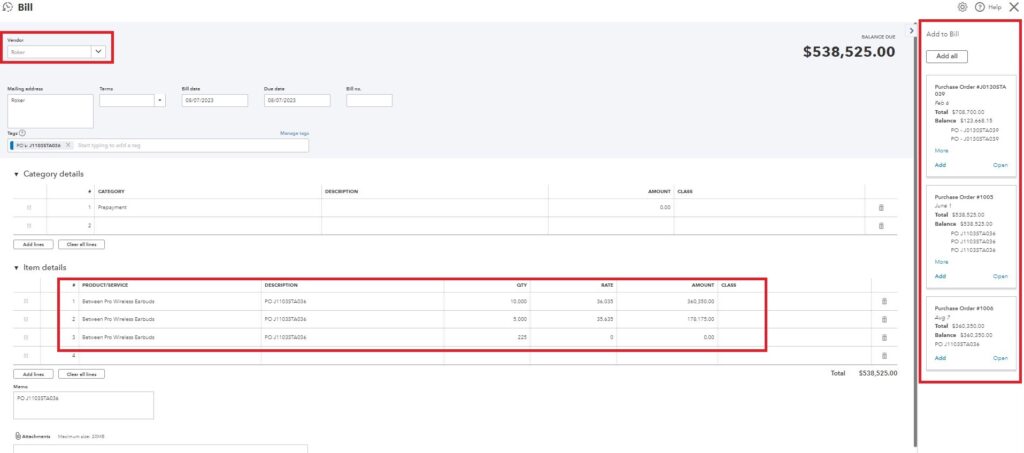
- From the Payee ▼ dropdown, select the vendor. This opens a window with their open purchase orders.

- Select Add for the correct purchase order. This adds the items from the purchase order. They appear in the Item Details section.
- Select the Billable checkbox if you plan to bill a customer for a specific item. Then add the customer you plan to bill in the Customer column.
- Select Save and Close.
👉🏻Add Part of a Purchase Order to an Expense, Bill, or Check
If you’ve received only part of a purchase order or made a partial payment, you can add those parts to a bill or expense. This links multiple transactions to the same purchase order:
- Select + New.
- Select Expense, Check, or Bill.
- From the Payee ▼ dropdown, select the vendor. This opens a window with their open purchase orders.
- Select Add for the correct purchase order. This adds the items from the purchase order. They appear in the Item Details section.
- Adjust the quantity or amount for each line item to reflect the portion you received or plan to pay for.
- Select Save and Close.
💡Tips
- You can link multiple transactions to a single purchase order. QuickBooks automatically closes purchase orders when all quantities are added to bills, expenses, or checks.
- You can use Quickbooks tags to identify the invoices and payments related to each purchase order. Learn about using tags in Quickbooks.
👉🏻See Your Open Purchase Orders
- Go to Business Overview, then select Reports
- Search for and run one of the following reports:
- Open Purchase Order List
- Open Purchase Order Detail
- Purchases by Product/Service Detail
- Purchases by Vendor Detail
Manage Vendor Prepayments
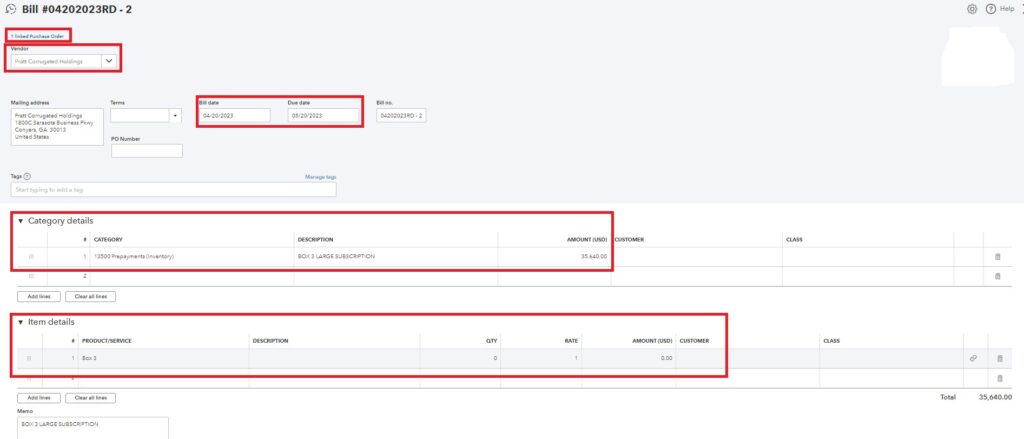
- Create a bill for the prepayment amount, attaching the proforma invoice.
- A pop-up with the open purchase order will appear on the right-hand side of the screen. Select Add for the correct purchase order and include “Prepayment” under “Category details.”
- If you are recording a payment in advance for goods that have not yet been received, indicate the number of zero goods received under Item Details. This will inform Quickbooks that it is a prepayment and that there is no inventory movement.

- After saving the bill, a debit is created for the prepayment asset account and a credit for A/P. See below for the journal entry that is automatically created.

- When the prepayment is paid with bill.com, the journal entry (JE) that will be reflected will cancel the liability on A/P and decrease the bank account from which it was paid.
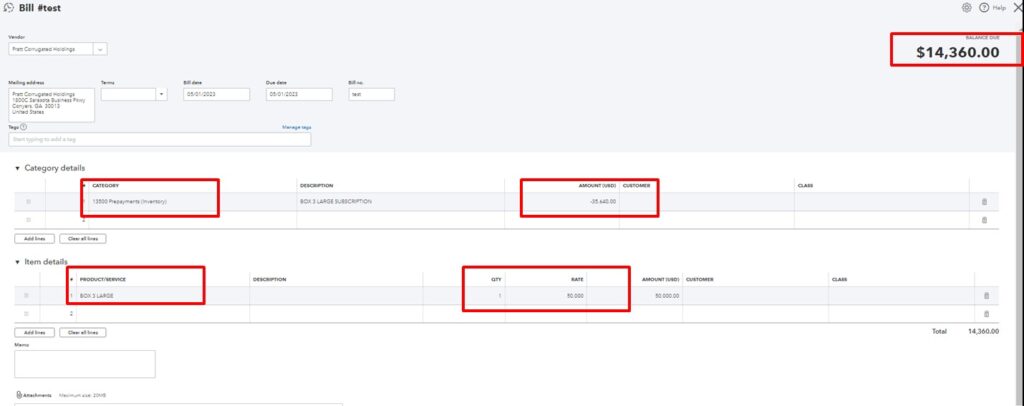
- When the expected bill for the goods and services comes in, enter the bill for the total amount using either the Item Details grid or Category Details grid, whichever is appropriate. Enter the prepayment amount in the Category Details grid as a negative amount. Recording the bill will reduce the balance in the asset account.

- On the accounting side, a debit is created for the prepayment asset account and a credit for A/P.

👉🏻View existing prepayments
- Go to the Reports menu, select Suppliers & Payables, and then Supplier Balance Detail.
- Select Customize Report, then go to the Display tab.
- Select the desired date range for the report.
- Go to the Filters tab, then select Account from the list.
- Select the asset account created to track prepayment amounts from the Account drop-down.
- Select OK.
Get Started with Purchase Orders
We’ve presented a lot to you here. With a lot on your plate already as a founder, your first reaction is probably to forward this article to your accounting or finance team. With this guide, they should be equipped to get started with purchase orders. And remember, ECOM CFO is happy to take it from here.
